
Owner's manual (PDF): find your model on our User Manuals page · Your exact model: see the Setup Videos page
Got a DVD/VCR combo and not sure how to hook it up? This guide works for most combo players, including Sony, Magnavox, Funai, Panasonic, Philips, Toshiba and Samsung. It shows what you need, which jacks on the back to use, how to connect an older TV with red, white and yellow jacks or a newer TV with only HDMI ports, and how to play DVDs and VHS tapes. Watch the video, or follow the written steps below. If your exact model has its own video, you'll find it on our Setup Videos page.
Video Chapters
- 0:00 Intro
- 0:23 What you need (and when you need the adapter)
- 0:52 Which jacks to use
- 1:20 Older TV with AV jacks
- 1:37 HDMI TV with the adapter
- 2:03 Pick the TV input
- 2:16 Power on and the remote
- 2:51 Play a DVD
- 3:14 Play a VHS tape
- 3:38 Quick fixes
Players and TVs This Guide Covers
- Players: nearly any DVD/VCR combo with red, white and yellow OUT jacks, including Sony, Magnavox, Funai, Panasonic, Philips, Toshiba and Samsung, plus most Emerson, JVC, Sanyo, Zenith and GoVideo combos.
- Older TVs: any TV with red, white and yellow AV jacks. The AV cable is all you need.
- Newer TVs: smart TVs with only HDMI ports. Add an AV-to-HDMI adapter.
- Not covered here: antenna hookups and channel scans, recording, and the HDMI output some combos have (on most of them it only plays DVDs, not tapes).
Step 1: What You Need
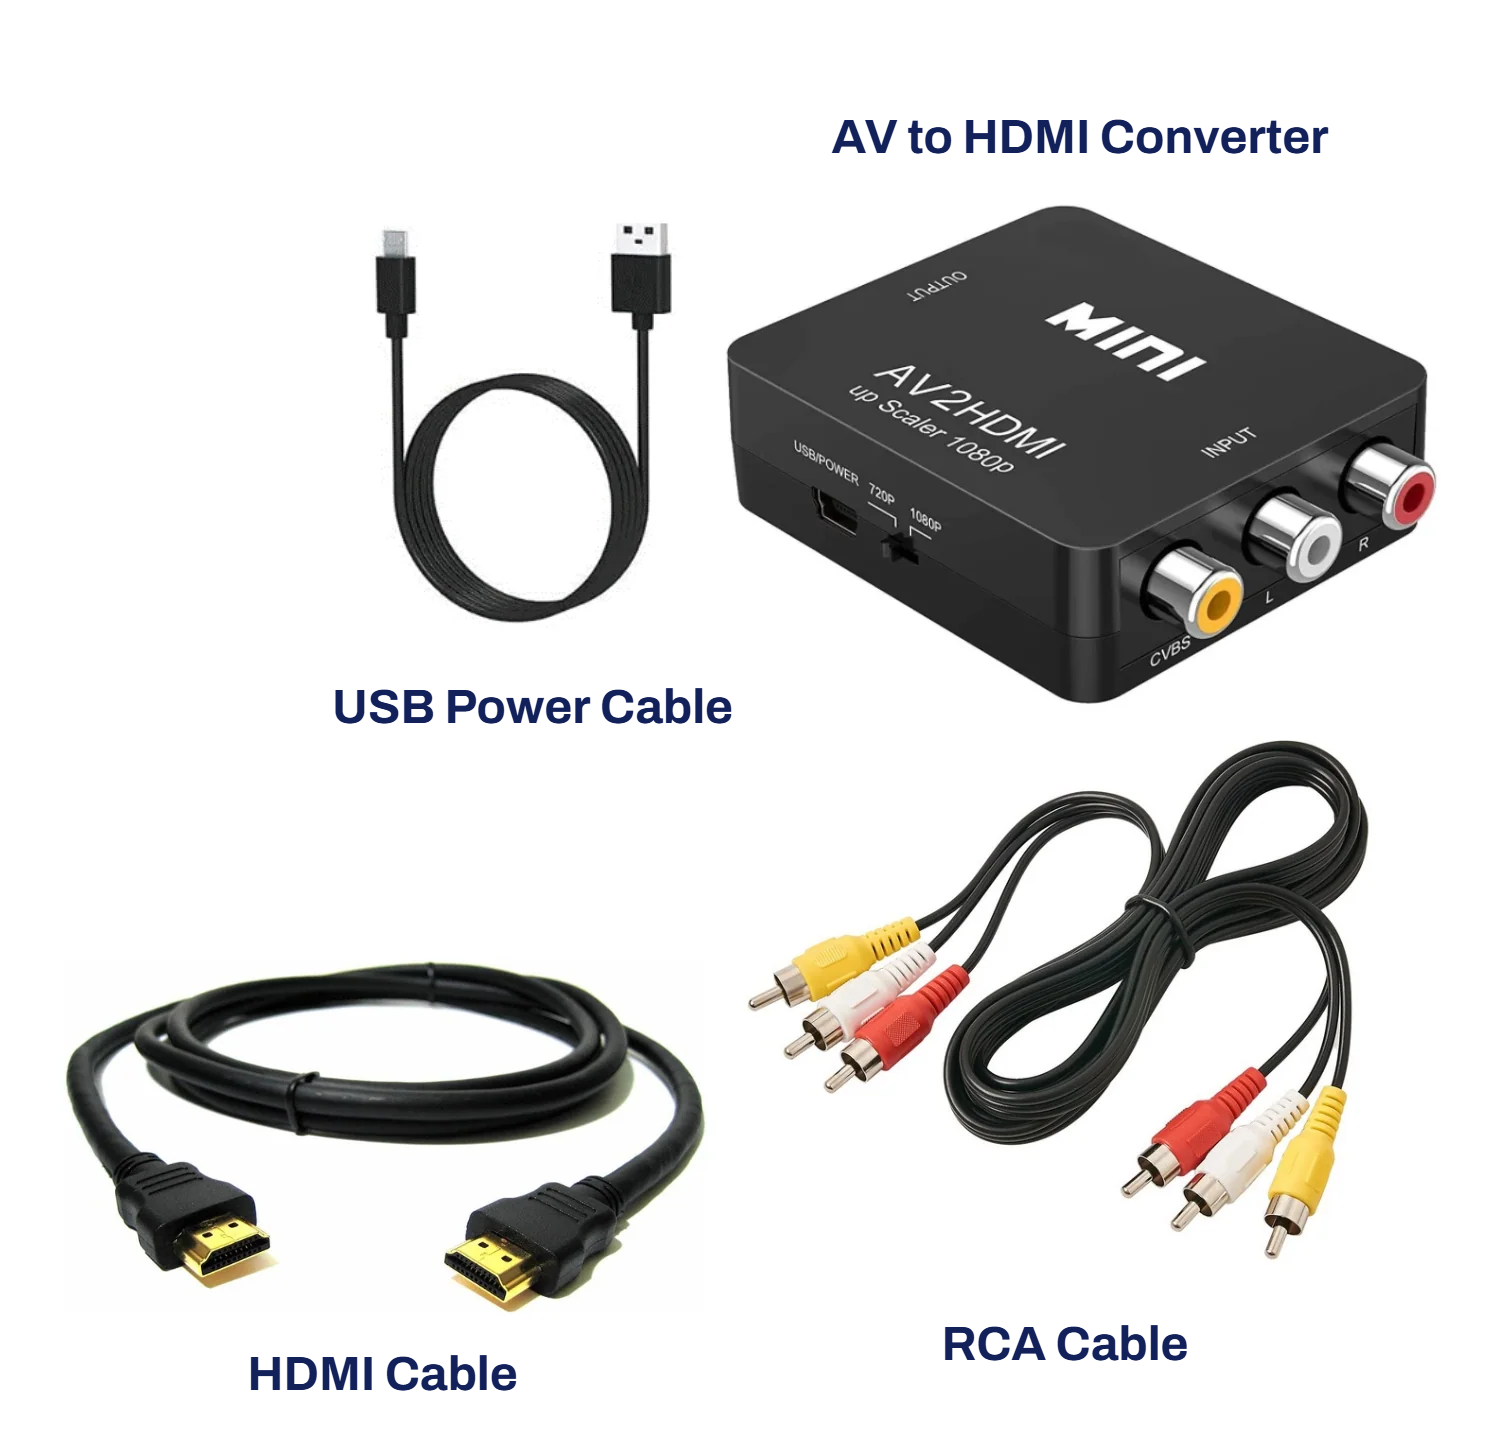
Every setup needs the DVD/VCR combo, its remote with batteries, and a red, white and yellow AV cable. If your TV has red, white and yellow jacks, that's all you need. Most newer TVs only have HDMI ports. For those you also need an AV-to-HDMI adapter, an HDMI cable and a USB power source for the adapter.
Step 2: Find the OUT Jacks
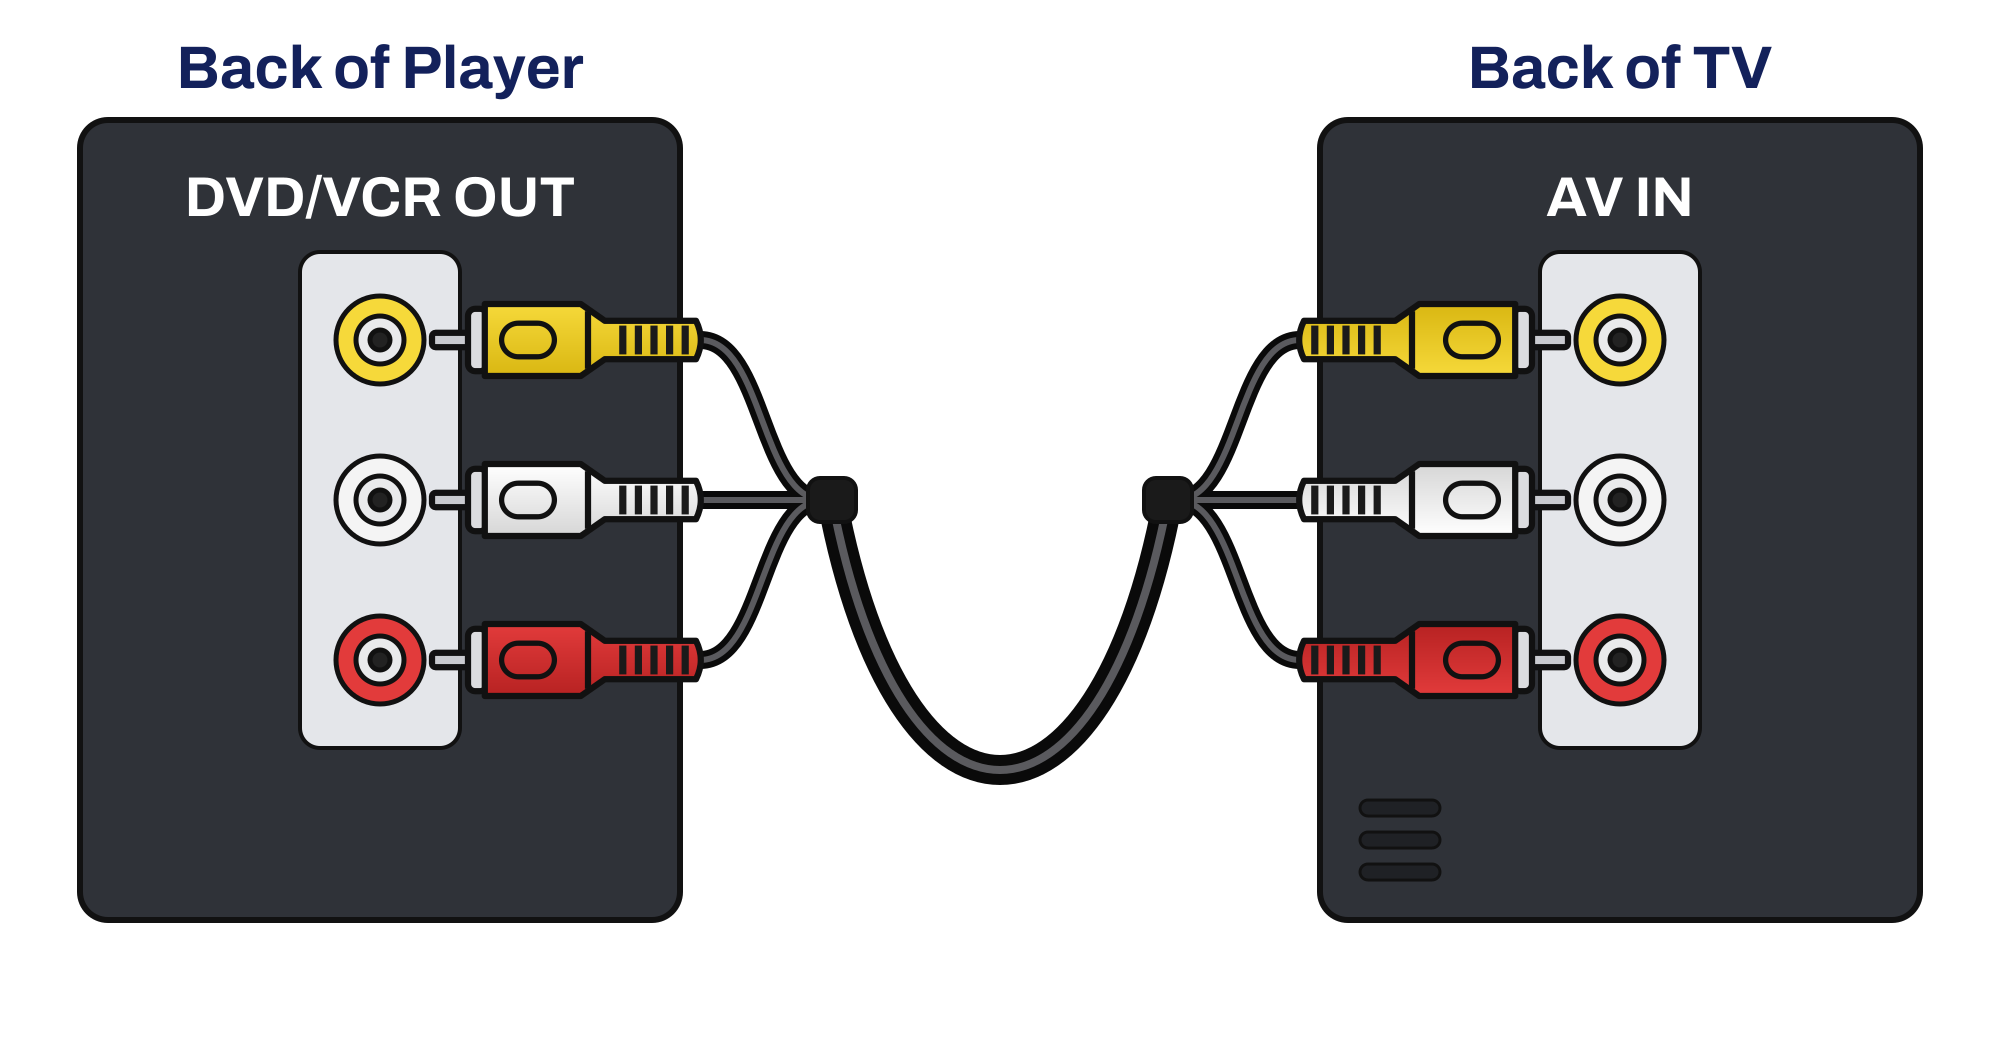
Turn the player around and find the three jacks marked OUT, in red, white and yellow. They are often labeled AUDIO OUT and VIDEO OUT, LINE OUT, or DVD/VCR OUT. These carry both tapes and discs, so these are the ones to use. Skip the jacks marked IN, which are for recording. Skip extra outputs like component, S-video or coaxial too. On most combos those only work for DVDs.
Step 3: Connect an Older TV with AV Jacks
- Plug one end of the AV cable into the player's OUT jacks.
- Plug the other end into the TV's AV or VIDEO IN jacks.
- Match the colors: white to white, red to red, yellow to yellow.
Step 4: Connect an HDMI-Only TV with the Adapter
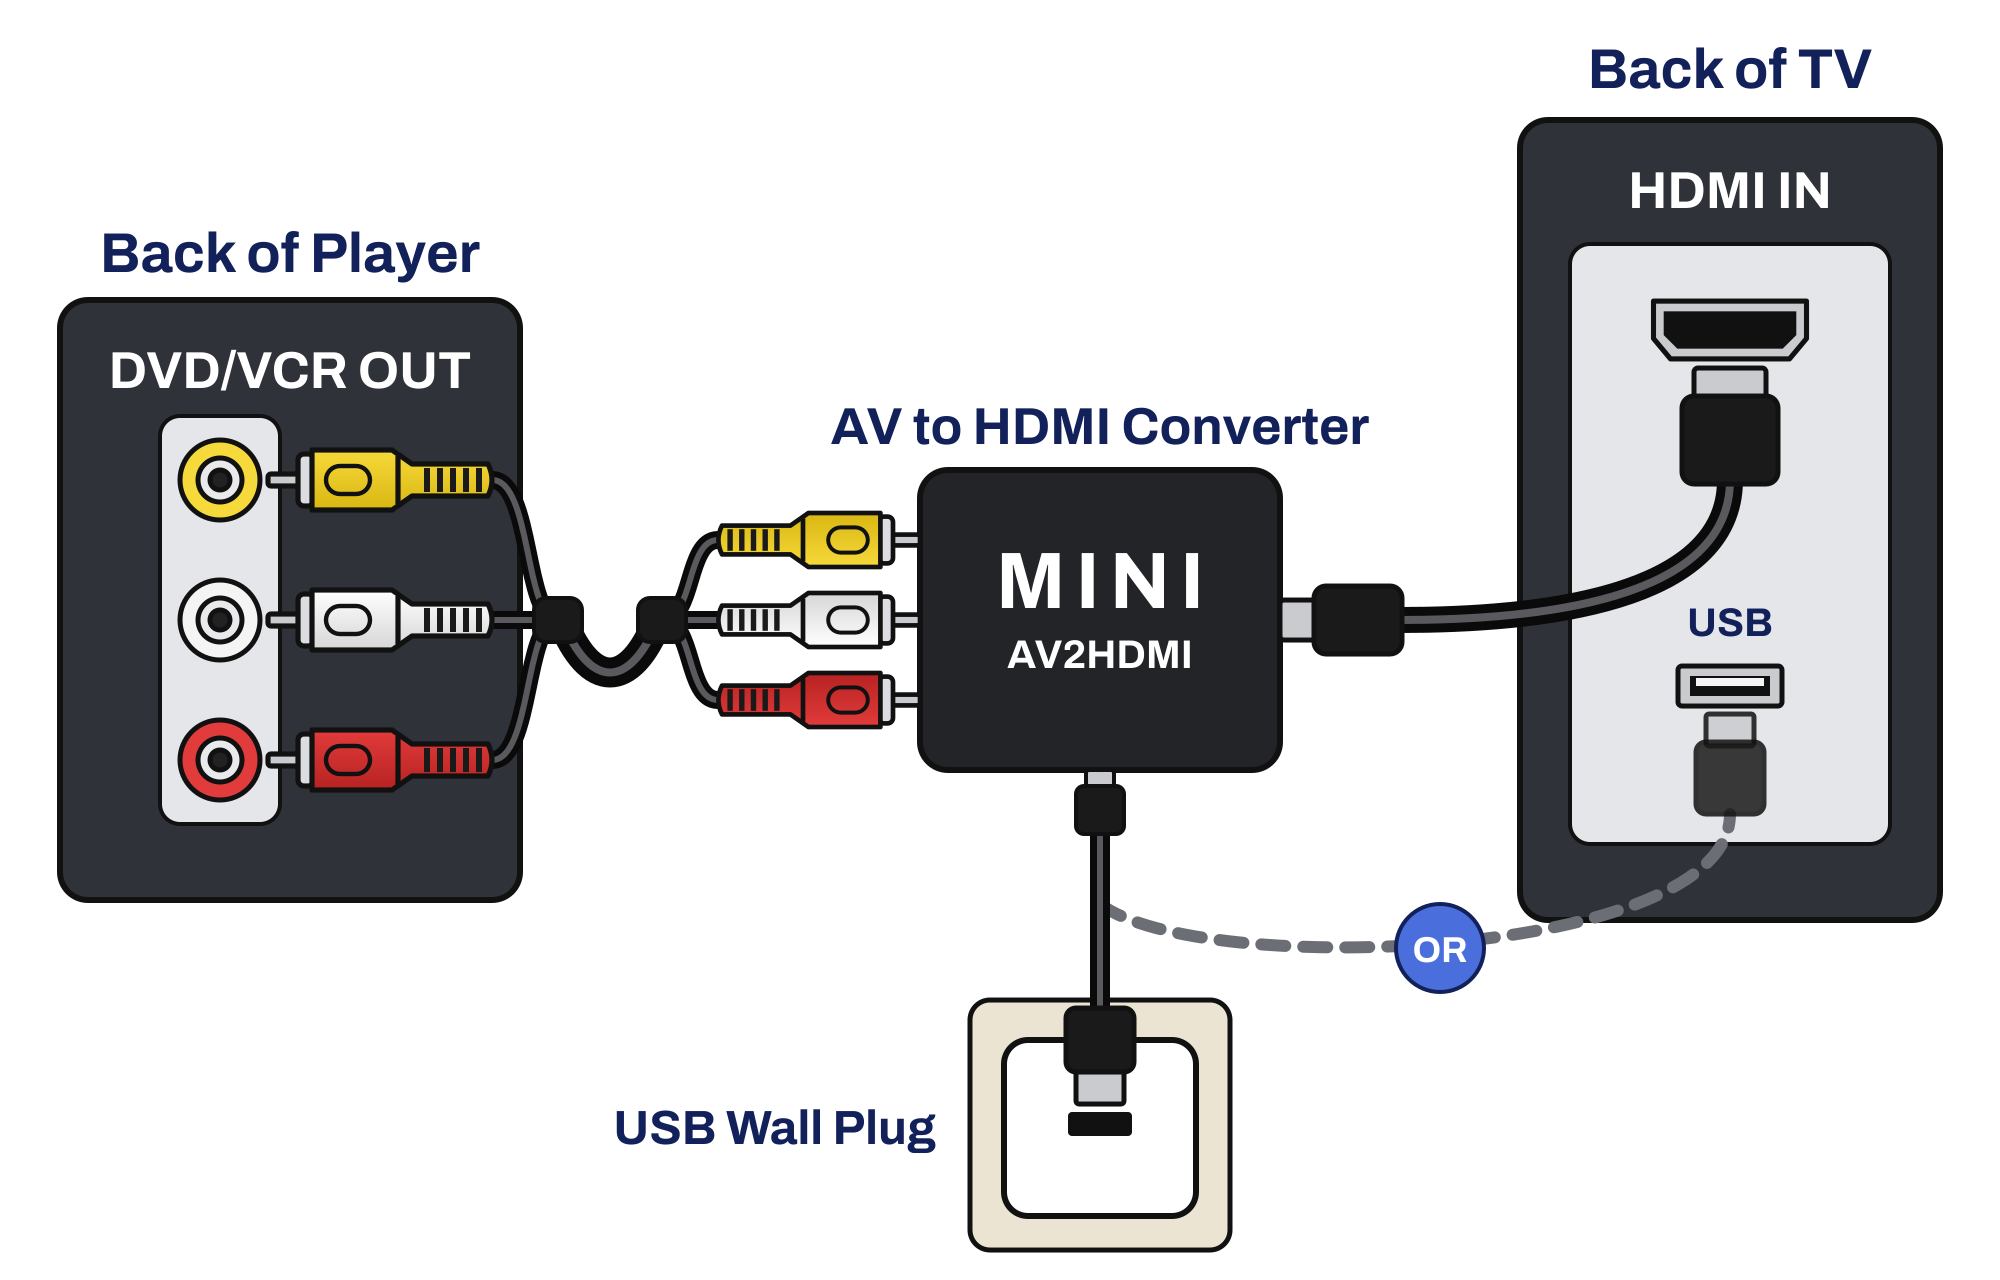
- Plug the AV cable into the player's OUT jacks, then into the adapter's INPUT side, matching the colors.
- Run the HDMI cable from the adapter's output to an HDMI port on the TV, such as HDMI 1.
- Power the adapter: plug its USB lead into a USB wall charger or a USB port on the TV.
More detail on the adapter is in our AV-to-HDMI converter setup guide. Teklinq DVD/VCR combos come with the adapter, HDMI cable and AV cable in the box.
Step 5: Pick the TV Input
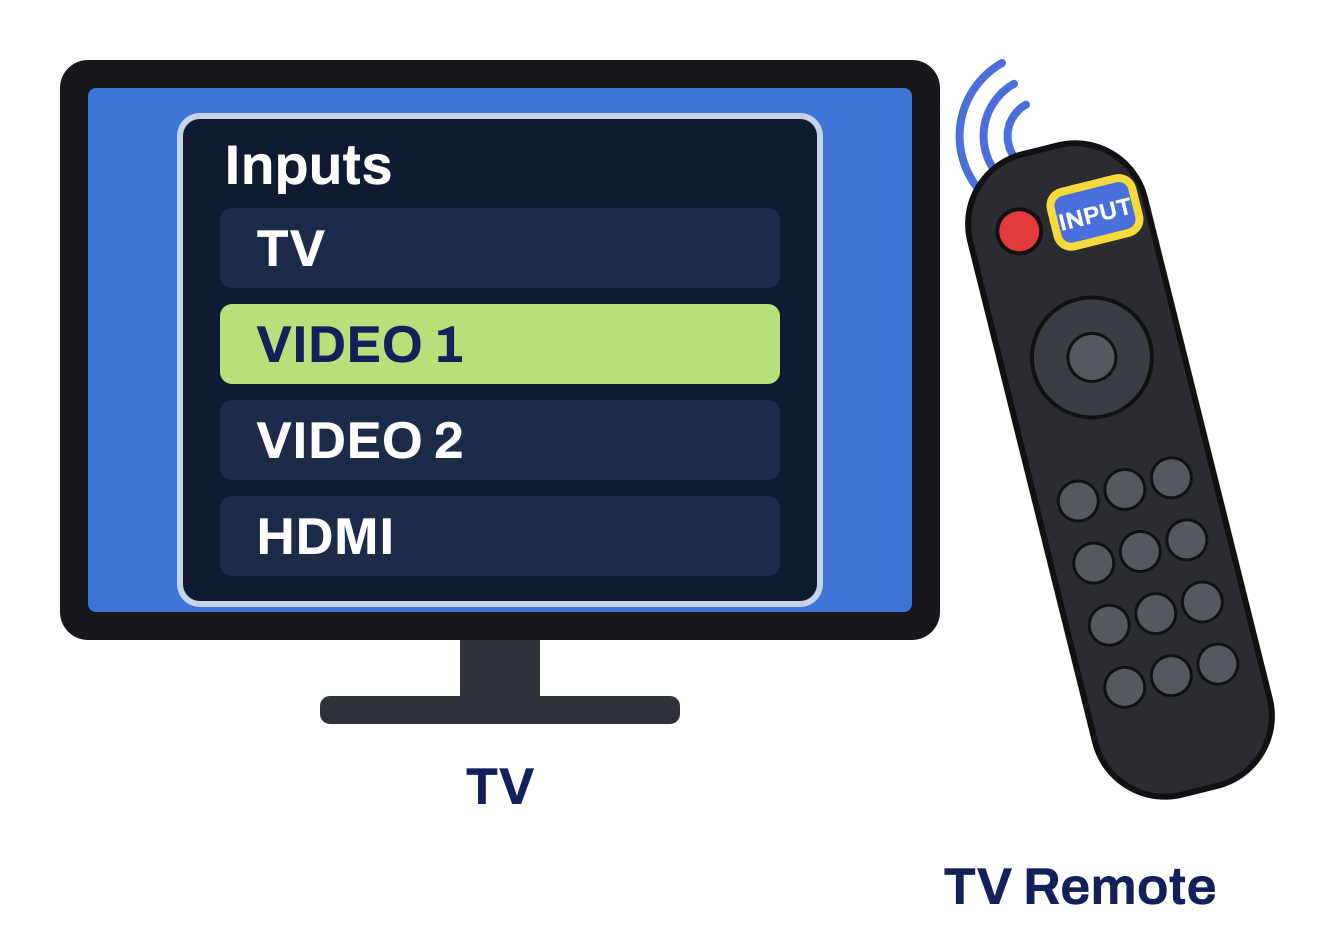
Turn on the TV. Press INPUT or SOURCE on the TV remote and pick the input you just used: AV or VIDEO for the color cables, or the HDMI number for the adapter.

Step 6: Power On and Learn the Remote
Plug the player into the wall and press POWER on the front or on the remote. Some players show a language or clock screen the first time. Use the arrow buttons and ENTER, OK or SELECT to make your choices, or skip the clock. The DVD and VCR buttons switch between discs and tapes. On some remotes it is one button, marked DVD/VCR or SOURCE, and the lights on the front show which mode you are in. Quick test: press DVD with no disc inside. You should see the player's logo or a blue screen on the TV.
Step 7: Play a DVD
- Press DVD on the remote.
- Press OPEN/CLOSE to open the disc tray.
- Set the disc in, label side up, and press OPEN/CLOSE again.
- Most discs start on their own. If not, press PLAY.
These players play Region 1 and ALL-region DVDs, the kind sold in the US and Canada.
Step 8: Play a VHS Tape
- Push the tape into the slot, window side up. Many players switch to VCR and start playing on their own.
- If not, press VCR, then PLAY.
- Lines or fuzz? Press TRACKING up or down (CHANNEL up or down on some models) until the picture clears.
- When you're done, press STOP/EJECT on the front of the player.
Troubleshooting
- No picture: make sure the cable is in the OUT jacks, not IN, and the TV is on the right input.
- Using the adapter and still no picture: check that its USB power is plugged in.
- No sound: check the red and white plugs at both ends.
- Remote not working: press DVD or VCR first, and check the batteries.
- Tapes play but DVDs don't (or the other way around): you are probably on a DVD-only output. Move the cable to the red, white and yellow OUT jacks.
Need your player's manual? Find it free on our User Manuals page. Model-by-model walkthroughs are on our Setup Videos page. Still stuck? Contact us or leave a comment on the video.
Shop
- DVD/VCR combo players, fully tested and refurbished, with the remote, cables and AV-to-HDMI adapter in the box
- VCR players
- AV-to-HDMI converter for TVs with no AV jacks
Teklinq is not affiliated with Sony, Magnavox, Funai, Panasonic, Philips, Toshiba or Samsung. Brand names are used only to describe compatibility and belong to their respective owners.